Deep etching is the secret to getting more sales for top-rated sellers in different eCommerce platforms. This is the most effective post-processing method that follows the standard guidelines of product photography. In 2024, Around 17.08 million Australians shop online monthly. This is going to increase more in 2025.
You can make your product photos to be the center of attention for online shoppers. Deep Etching Service will assist you with that. In this article, we will explain how to deep etch an image in Photoshop.
We will break down the process into 8 simple steps. So, that will be easy to follow.
How To Deep Etch An Image in Photoshop?
Step 1: Open Your Image In Photoshop To Deep Etch
Step 2: Use The Pen Tool To Deep Etch The Image
Step 3: Creating Paths
Step 4: Save Path
Step 5: Isolate The Background
Step 6: Fix Object Position
Step 7: Add A White Background
Step 8: Save The Deep Etched Image
Step 1: Open Your Image In Photoshop To Deep Etch
First, you need to open your image in Photoshop for deep etching. You can use any object with different shapes. For this Photoshop deep etching tutorial, we are going to use the below image.

The background is locked here so we need to unlock it. You just need to double-click on the background layer for that.
Step 2: Use The Pen Tool To Deep Etch The Image
Now, we have to select the object so that we can separate it from the image. For deep etching, you have to use the pen tool for the highest accuracy. You can get the pen tool from here.

After that, we have to create a boundary line around the object to separate it. You have to create anchor points around those areas.

The object should be covered only within the path.
Step 3: Creating Paths
In this step, you have to zoom in on the image by pressing “CTRL +”. It will allow you to have a better view of the object. Then, you have to click the left mouse key on the point where you want to create an anchor point.

You have to create paths in this method and move forward to cover the entire object. While creating paths for the object, you may have to select curved areas.
For those areas, you need to hold the left mouse key and move the mouse to get curved lines. Ultimately, you have to join the final anchor point with the starting point.

No portion from the background should be included within the selection and no portion from the object should be excluded from the selection.
Step 4: Save Path
To save the path, you have to click on the path section from the layer panel. Here’s the option.

We have deep etched the object properly so that we can isolate it from the background. Double-click on the work path and you will get the saving option. Rename the path if you want and press Enter to confirm the changes.
Step 5: Isolate The Background
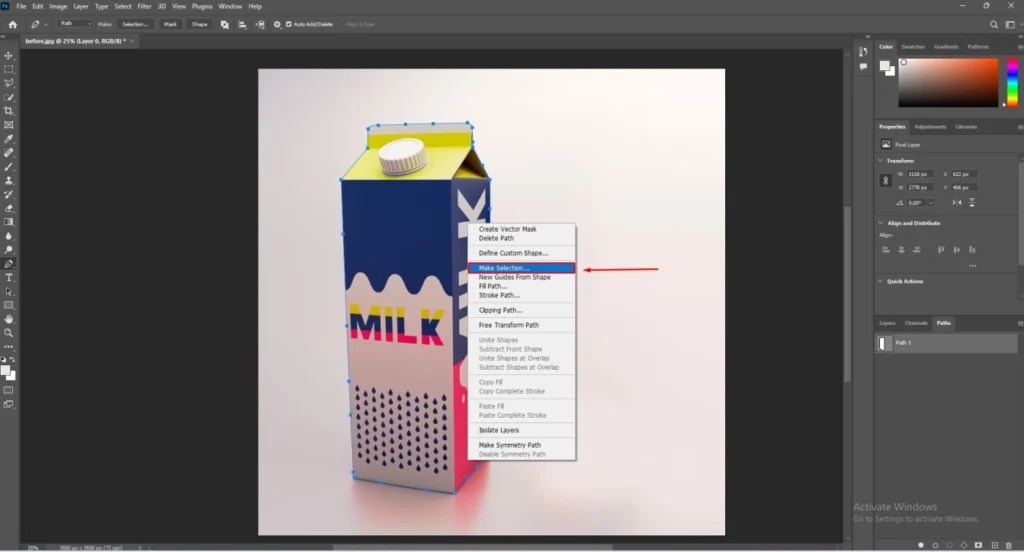
To deep etch an image in Photoshop, we have to isolate the original background. We have to convert the path into a selection for deleting the background. Right-click on the object and you will get the “Make Selection” option.

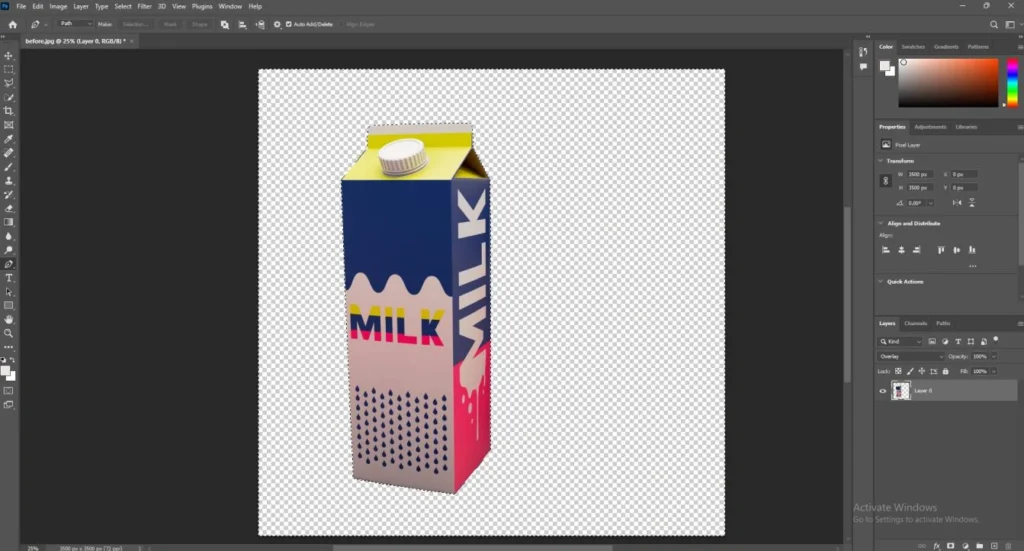
Press enter to apply it to the image. It will bring your image in this form.

The moving dotted lines indicate the selected portion. So, we have selected the object properly. Now, we need to press CTRL + SHIFT + I for reverse selection. Then, press the Delete key. It will remove the background and make it transparent.

Now, we have to make some adjustments.
Step 6: Fix Object Position
As you can see, the object isn’t positioned in the middle. So, we are going to fix the object position. We can do that using the Move tool. Here’s the option.

Click on the move tool and place the object in a suitable position. For this image, we are going to place it at the center. Here you go.

If you want to keep the background transparent, the process of how to deep etch an image in Photoshop is completed for you. To get a solid color background or pure white background you have to follow an extra step. You can skip it for a transparent background.
Step 7: Add A White Background
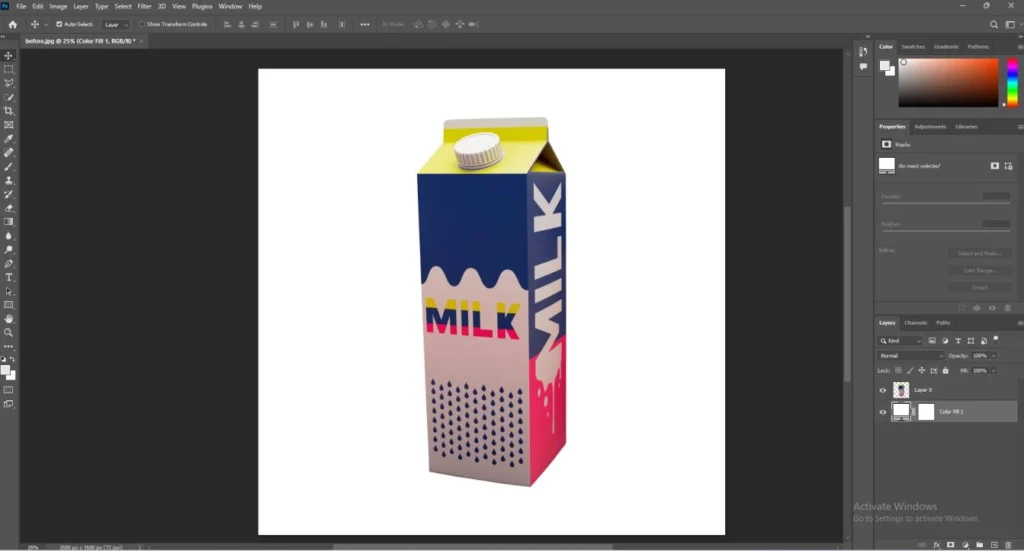
We are going to add a solid color layer to add a white background to the image. Here’s the option for solid color at the adjustment layer panel.

Click on the solid color and choose a white color from the color picker option. You can also use other colors such as off-white or any solid color. However, we are going to select a white color background for that image.

The object layer should be at the top and the background layer should be below that. You can drag the layer by using the left mouse key.
Step 8: Save The Deep Etched Image
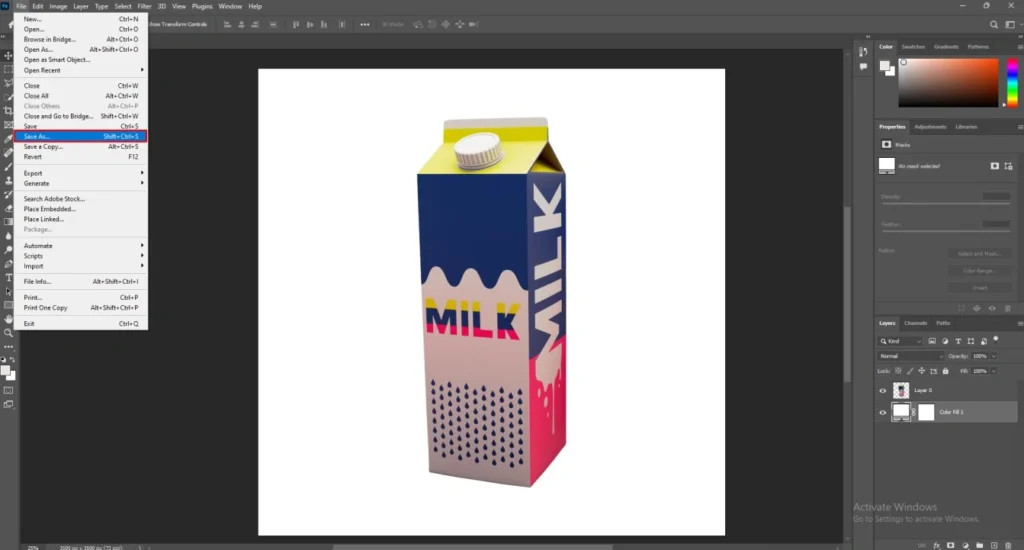
Now, we have successfully deep etched an image in Photoshop. The image is now ready for saving. Click on the file option from the top and choose the ‘Save As” option.

You can choose any format according to your requirements. JPEG is the most suitable format for product photography.
3 Golden Rules To Follow
- Use the refine edge tool to make the selection more precise and professional. Keep it balanced
- To keep the deep etching method non-destructive, use the layer mask option rather than delete.
- Use CTRL and ALT key to make the path line more accurate and align with the object’s boundary
3 Worst Mistakes
- Don’t over-complicate the selection process. Create anchor points only where it is needed.
- Don’t add high feather value while making a selection of the object. It will damage the sharpness.
- Don’t create an additional work path when you can do it with a single path. Otherwise, it will make the process complicated
Final Words
At this point, you should not have any confusion about how to deep etch an image in Photoshop. By following the above procedure, you can deep etch any image in Photoshop.
From now on, an unsuitable background can not bother you anymore. But it could be difficult for you to do it yourself for bulk images. No worries, Deep Etching Service in Australia is available to assist you.
We have more than 100 designers to fulfill your deep etching requirements. We can handle bulk orders and tight deadlines. We are available 24/7. A free trial is available for Aussie photographers, eCommerce owners, and online sellers.

